
Four Colorful Ways to Re-use Your Old Seed Catalogs:
Suggested Materials:
- seed catalogs
- scissors
- double sided tape
- clear contact paper
- glue or glue stick
- masking tape, painters tape or scotch tape
- washi tape (optional)
- large drawing paper
- markers, pencils, crayons
- DIY Rainbow Nature Journal
A couple of things before we begin--
Children who are old enough to use scissors can definitely cut out pictures independently. It's a great cutting practice activity and recycled magazines and catalogs are a great addition to your scrap paper bin. Recycling, re-using and up-cycling are all integral parts of our Sprout Scouts Playcamp themes and our family values all year round. If you do not have a seed catalog or don't want to cut yours up

Suggested Reading:
- Planting a Rainbow, Growing Vegetable Soup and Eating the Alphabet all by Lois Ehlert
When it comes to children's literature about nature and gardening, Lois Ehlert is one of my favorite author/illustrators! Her children's books truly inspire get outdoors and read with my kids in every season. These are just a few great titles to check out from your local library or add to your personal library.
- The Reason for a Flower by Ruth Heller
- A Seed is Sleepy by Dianna Aston & Sylvia Long
- What Makes a Rainbow? by Betty Schwartz
 |
| I set our pictures in a bag hung over the doorhandle right beside our sticky wall. You can store yours on a shelf nearby or in a basket or tray depending on where your sticky wall is located. You can also tape a large envelope to the wall and store pictures inside. |
- What's Growing in Your Garden Sticky Wall: In our first activity, you'll set up a sticky wall using clear contact paper on any vertical surface at child level. You can tape it to your wall, a door or even an easel. I love using a colorful washi tape border to make it pop (otherwise it really blends in!), but you can just use masking tape, painters tape or even clear scotch tape. Using cut outs of colorful vegetables, fruits, flowers, herbs and gardening supplies, children can stick pictures onto the sticky wall. This is especially geared toward the 2 and under crowd, but my almost 4 year old also loves the sticky wall!
- Garden Wish Collage: In a variation of the previous theme, children plan and plot out their own dream garden using markers or crayons to draw the background and pictures cut out from seed catalogs to add what they wish or hope to grow. Older children can be shown garden plans and blueprints and you can even provide graph paper for a more realistic approach. Younger ones may be more inclined to glue on pictures and use markers or crayons for adding in background details.

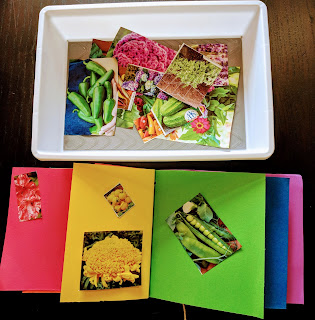
4 .Growing a Rainbow Nature Journal: We are using our Rainbow Nature Journals with seed catalog cut outs and double sided tape to collect pictures in each color that we particularly love. It's a beautiful way to capture the rainbow of things we can plant, grown and eat!

These are great filler activities and ones you can pull out or set out over the course of multiple days. I'll bet you can think of even more great ideas and I'd love to steal hear about them! Until then...
Happy Planting, Growing, Eating and PLAYING!
No comments:
Post a Comment